Showing posts with label tricks. Show all posts

Monday, 18 November 2013

Use sed to retreive links from a Firefox bookmark file

Sed is a great text manipulation tool. It allows to manipulate text through simple substitution commands.

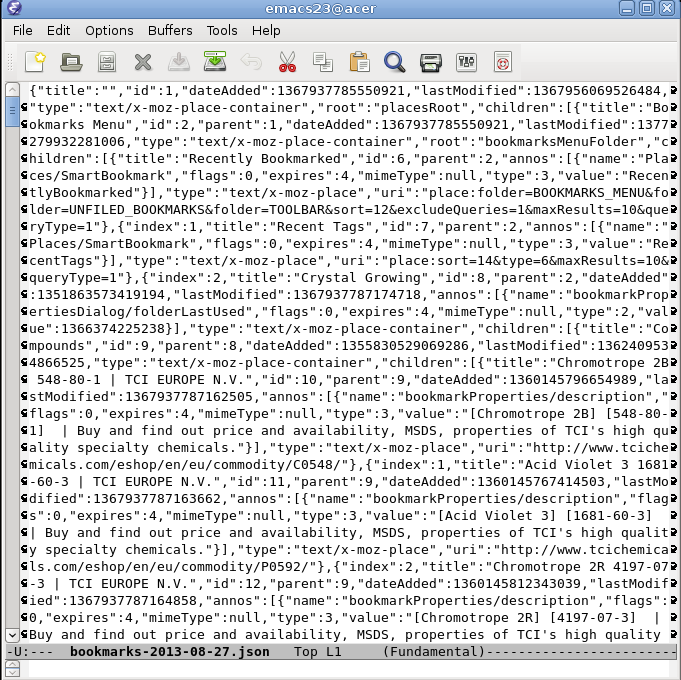
It did occur to me that I had a few backup .json files in which Firefox bookmarks were stored. As I did not want to overwrite the existing bookmarks, but I wanted to retreive just a few links, I tried to open the file with a text editor.

The result was not pleasant:


I decided to use some CLI magic to transform this in a list of URLs which is easily readable, instead. It can be done in one line:

$ sed "s/\"uri\"\:\"/\\`echo -e '\n\r'`/g" bookmarks.json | sed "s/\"[^@]*$//" > new_bookmarks.txt

Where:   bookmarks.json -> bookmark file name
            new_bookmarks.txt -> new file name where the links will be saved

Enjoy!


Thursday, 30 May 2013

MailMe: how to get notified automatically via email through BASH

In my job, I have to perform calculations on a remote machine to which I connect through ssh. It happens quite often that I have to run a few jobs overnight, if not for days. I could check manually for their termination, but I came up with a better way.

In a previous post I described how useful it can be to run script in background on the machine without having to be logged-in. Combining the power of screen with the utility of mail we can create a script which will automatically send an email whenever the job is finished.


The Script


#!/bin/bash
#
##
## This scripts sends an automated email as soon as a job is finished
##
## ***   Use with screen:
## ***  
## ***   $ screen -S [job-id]               (start screen)
## ***   $ mailme [job-id]                  (run mailme in screen)
## ***   Ctrl+a d                           (detach)
## ***   Ctrl+d                             (kill screen, from session)
## ***   $ screen -ls                       (check running screens)
## ***   $ screen -r [screen-id]            (resumes session)
## ***   screen -X -S [screen-id] kill      (kill screen, from outside)
## ***  


# Need argument: job id which needs to be checked for completion
if [ -z "${1}" ] ; then
    echo "Please insert job ID as argument"
    echo "Exiting status 1"

    exit 1
fi


# Need second argument: email
if [ -z "${2}" ] ; then
    echo "Please insert email as second argument"

    echo "Exiting status 1"
    exit 1
fi


# Put your email here
zzEMAIL="${2}"
zzJOBID="${1}"
zzFREQ=3600 #Frequency of checks, in ms
zzEND=true


# Loop that checks job status
while "${zzEND}"
do

    zzSTRING=$(bhist -d | grep "${zzJOBID}")
   
    if [ ! -z "${zzSTRING}" ] ; then
   
    zzEND=false
   
    echo -e "Dear Sir,\n\nThis is an automatic email from grep Linux indicating that the job ID\# ${zzJOBID} has been terminated (succesfully or not).\n\nThis is the output:\n\n $(bhist -d) \n\nBest, \ngrep Linux | mail -s "Job ${zzJOBID} Completed!" "${zzEMAIL}"
   
    else
   
    sleep "${zzFREQ}"
   
    fi
   
done

exit 0 


The comments should provide a satisfactory explanation, but it could be used straight away for jobs submitted through the routine bsub.

You would just need to run the script from a screen and the game is on. If you do not remember how to do this, I have put some reminders in the header section of the script, or you can check my guide to screen.

You can run multiple of these scripts in multiple screen sessions if more jobs need to be tracked.


Afterthoughts


This script has been designed to check job progress and send an email  whenever the job is complete. Through an easy modification of the condition to be checked in the variable zzSTRING in the loop, anything can trigger the delivery of an automated email, potentially making the scope of this script very broad.

Have a play with it and let me know how you use/modify it!


Wednesday, 15 May 2013

Motion: use your webcam as a security camera!

Last month, my landlord told me he had to send an engineer to fix the heating in my room. I could not be at home at the time they would come, but they would have access anyway.

This is one of the many occasions in which you wish you had a hidden security camera at hand (together with when you want to know if you roommate is really stealing your chocolate and when you suspect there are undesired animals in your room!).

But the solution is just in front of you, right now! Your computer's webcam is a hidden and usually unsuspectable object and it can be easily turned into a monitoring device.

And Linux helps us doing it very easily with a small program called motion.

Motion saves snapshots from your webcam whenever movement is detected by the webcam itself. Increasing the capture rate, it can produce decent videos as well.


Configure


Motion needs to be configured before it can be used. Configuration allows for a big list of customizations, as frame capture rate, image resolution of the frames, motion sensibility, webcam properties and many others. It is very easy as most of it is already configured.

First of all, copy the config file in your user account. From a terminal:

$ cd
$ mkdir .motion
$ sudo cp /etc/motion/motion.conf ./.motion

Then change the ownership of the file to your user (it was copied from root)

$ sudo chown [username] ./.motion/motion.conf

 And open it with your favourite text editor (which is emacs, of course):

$ emacs ./.motion.conf


In the ideal case, you would not need to modify anything. But it would be safe to skim through the file to see if there are things you want to change. Comments (line starting with #) are very exhaustive and it is difficult to get lost. The most important would be:

videodevice /dev/video0

which selects the webcam device used, or the directory where the snapshots are saved:

target_dir /home/user/your_folder


Usage


Funnily enough, using the program is easier than configuring it. Just open a terminal and run the command:

$ motion

You will see a lot of gibberish-looking lines and if you are in front of your webcam, you can test it straight away, as it will be saving pictures already, if you are moving.

To close the program when you are finished just press

ctrl-c

and you will not lose anything as the pictures will be saved in the folder you chose during the configuration stage.


Bonus


As an addition for extra security, you could connect the folder to the internet over cloud sharing services as dropbox or copy, and look for movements in your room real time! 


Tuesday, 23 April 2013

Screen: how to run processes in the background after log out

So, you want to run a very long process on your ssh server but you need to log out.

It sounds like an impossible problem, but as long the computer is on, why can't it run processes in the background? Well, it can, and there is a simple solution using a quite clever command-line window manager:

Screen

Screen can create multiple windows in a shell, from which you can "detach" and leave them running in the background, even if you log out of your user account.


Create a Screen


From a terminal, type:

$ screen -S [choose-a-window-name]

And you will immediately enter the window just created.
From this window you can type any command and leave it running in the background.

To detach from the window and go back to the terminal, just press the combination:

ctrl-a d

And you will go back to the terminal, where you can start more screens if needed, or even log out without stopping the job.


Access a previously created Screen


From a terminal, type:

$ screen -r [window-name]

to revert a previously created screen. If you do not remember the window name, you can list them through the command:

$ screen -ls

which gives information about the active screens and their names.


Kill a Screen


If your job is finished in one screen and you want to close it, you can go revert it and press:

ctrl-d

to close it, or you can close it from outside the screen through the command:

$ screen -X -S [window-name] kill


Conclusion


Screen is a very powerful tool and its uses span a much wider scope than the ones described here. It can be regarded as complete full-screen window manager.

For ssh users, though, it is a lifesaver as it allows to run for nasty and long processes at anytime of the day without needing your presence.

Wednesday, 26 September 2012

Quickly create new empty files on Gnome (Nautilus) desktops

I don't know if you, like me, use the Desktop as a place for urgent notes. I do, and a lot!

I create empty files and rename it with the note I want to write in it and dispose of them easily deleting them whenever I don't want the note to appear.

Unfortunately the way to create those files is not one of the nicest, if you are in a rush: right-click on Desktop, find Create Document and click on it, find Empty file and click on it.

That is why I found a quicker way using the keyboard:

- Right click on Desktop
- Press D and then Return

And you have a new empty file ready to be written!

Sunday, 16 September 2012

The Matrix effect

It has been a while since last time I wrote a blog post. I planned ahead of myself and wrote a bunch of posts in early July, which filled the whole of summer schedule very well.

I had a nice summer, by the way, and I am about to begin my new occupation (PhD) which I am sure will take a lot of my free time. I know I tend to be very optimist (or I used to) and I would tell myself: "I can keep my schedule, at the end it is just one post a week".
But, even if it does not seem like it, I noticed that it takes a lot of time to write a good, well documented and effective (targeting the right audience and being coherent in difficulty) Linux post. And, on a side note, I consider myself a perfectionist and I generally like to go deep into stuff, so that does not help when I try to cut back on the time.

I decided to be more realistic this time, and I am apologizing in advance if I will not respect my weekly schedule. I will keep sure to write at least every fortnight, also because I would miss it otherwise. I also have another blog to maintain (see in contacts), so I am trying to split the time spent on them equally.

I have a treat for you, now. Open up that terminal of yours and run this string:

echo -e "\e[1;40m" ; clear ; while :; do echo $LINES $COLUMNS $(( $RANDOM % $COLUMNS)) $(( $RANDOM % 72 )) ;sleep 0.05; done|gawk '{ letters="abcdefghijklmnopqrstuvwxyzABCDEFGHIJKLMNOPQRSTUVWXYZ0123456789@#$%^&*()"; c=$4; letter=substr(letters,c,1);a[$3]=0;for (x in a) {o=a[x];a[x]=a[x]+1; printf "\033[%s;%sH\033[2;32m%s",o,x,letter; printf "\033[%s;%sH\033[1;37m%s\033[0;0H",a[x],x,letter;if (a[x] >= $1) { a[x]=0; } }}'

Cool uh? If it does not work, make sure you have gawk installed.
I will leave you with that and see you next time.

Sunday, 26 August 2012

How to batch rename files in Linux

Say you have a bunch of pictures and you want to rename them in a certain fashion. You can do it without the use of any external software and without painfully modifying the name of the pictures manually.

You can do it using just one command line! (even without using sed nor rename, if in a bash shell)


Strategy

Open a terminal and access the folder in which you have the files you want to modify:

$ cd ~/Desktop/Folder_name

Then use this command to modify the name of the files inside, to your need:

$ for file in *.* ; do mv [SOURCE_NAME] [DEST_NAME]; done


Examples

The examples below have increasing difficulty. Make sure to understand the previous ones before passing to the more complicated ones. Some knowledge of BASH will certainly help, but even you could use them blindly. Remember to be wise and make backups first, though.

If you have files with the same extension in the folder, such as JPG images, and you want to add a prefix, use this command:

$ for file in *.JPG ; do mv "${file}" "prefix_${file}"; done

If you want to add a suffix, instead, use this:

$ for file in *.JPG ; do mv "${file}" "${file%.JPG}_suffix.JPG"; done

And if your folder is full of mixed files, but you still want to add a suffix:

$ for file in *.*; do mv "${file}" "${file%.*}_suffix.${file#*.}"; done

If you want to number the files as well, sorting for modification time, use:

$ c=0; for file in $(ls -rt); do let c=${c}+1; mv "${file}" "prefix_${c}_suffix.${file#*.}"; done

Have fun renaming!

Tuesday, 17 July 2012

Everything you need to know about internet dongles on Linux

Yet another mobile broadband dongle is not working out of the box on your beloved Linux distribution.

If you are new to Linux, this might be one of the most annoying problems you will face, as there is a sea of different kinds of these internet dongles and they usually all require different drivers to be detected.

Fortunately, as almost every single wireless broadband dongle user seeks for help on Linux forums for his particular hardware, there is lot of help around from which you can guess and work out what is your problem.
But this makes the search messy, as often beginners get easily lost and reading discontinue posts on what to do is sometimes more difficult than trying to work out a solution on your own.

I am writing this post to settle down - hopefully once and for all - the main tests everybody (with any kind of mobile broadband dongle) should perform before asking for installation help in a forum. I've seen tens of posts about internet dongles which were solved with the same standard procedures. I will provide simple steps to interpret the problems and solutions to try to make your dongle working by yourself.

This guide is meant to be written for a generic (beginner) Linux user with a generic broadband dongle. All the commands should work on any Linux distribution. For your information, the distribution I used to make this tutorial is Debian Squeeze with Gnome (GUI), and the broadband modem is an obscure Olivetti Olicard 200, which was only known to be not very Linux-friendly.

1. Check that your system sees the hardware


Firstly, remove your PIN from the SIM card using a mobile phone, as it can unnecessarily complicate things.

Whenever you plug-in your usb broadband modem, the very first thing you always need to check is that your systems realizes that something has been plugged-in your usb port.

I am assuming that your mobile broadband dongle is working on the first place (can check on a Windows system, if you are not sure). A flashing led should show you that the electronics are working inside.

Run this command to see if the modem is recognized as plugged-in a usb port:

$ lsusb

If you see an error message, you most probably do not have installed the usbutils package. The output will be something similar to:

Bus 008 Device 001: ID 1d6b:0001 Linux Foundation 1.1 root hub
Bus 007 Device 001: ID 1d6b:0001 Linux Foundation 1.1 root hub
Bus 006 Device 003: ID 04b4:0060 Cypress Semiconductor Corp.
Bus 006 Device 001: ID 1d6b:0001 Linux Foundation 1.1 root hub
Bus 005 Device 001: ID 1d6b:0001 Linux Foundation 1.1 root hub
Bus 004 Device 001: ID 1d6b:0001 Linux Foundation 1.1 root hub
Bus 003 Device 001: ID 1d6b:0001 Linux Foundation 1.1 root hub
Bus 002 Device 028: ID 0b3c:f000 Olivetti Techcenter
Bus 002 Device 003: ID 04f2:b044 Chicony Electronics Co., Ltd Acer CrystalEye Webcam
Bus 002 Device 001: ID 1d6b:0002 Linux Foundation 2.0 root hub
Bus 001 Device 001: ID 1d6b:0002 Linux Foundation 2.0 root hub

This is the list of the usb ports and what is connected to them, you should recognize your broadband dongle by the brand name. Sometimes the names do not coincide, so if you have troubles finding it in the list, disconnect it and run lsusb again to check which device is missing. The missing device is the broadband modem.

Take a note of the codes just before the brand name. In my case the numbers are:

0b3c:f000

where 0b3c is the vendor code and f000 is the product code.
This product code is used for storage usb dongles. As most of mobile broadband dongles are also capable to store data, the system is not recognizing the dongle as a modem. If you have this product code as well, proceed to Step 2.

If you see a code like XXXX or cXXX (where X is any number from 0-9), instead, your system already recognizes your dongle as a wireless broadband modem.
You can skip Step 2 and proceed to Step 3.

2. Switch device from usb to modem

(this step requires an internet connection, you can gather the packages from another pc if you are not able to connect on your own)

Your internet dongle is not recognized as such. We will use a software to let your system recognize it, called usb-modeswitch. You need to install two packages which are part of this program: usb-modeswitch and usb-modeswitch-data. Also install wdial and modemmanager, if for some reason are not installed already.

Once installed, you will need to type a single command to switch the mode of your internet dongle from storage usb-stick to modem.
Firstly, you will need some information:

- The vendor code, as found before usign lsusb (in my case 0b3c)
- The product code, as found before usign lsusb (in my case f000)
- A Hex key, associated to vendor and product code.

You already have vendor and product code, but in order to obtain the Hex key, you need to run the following command, which will retrieve the Hex key from your system.

 $ cat /etc/usb_modeswitch.d/[vendor code]\:[product code] | grep MessageContent

You need to substitute [vendor code] with your vendor code and [product code] with your product code. In my case, the command is:

 $ cat /etc/usb_modeswitch.d/0b3c\:f000 | grep MessageContent

This will print on your screen the Hex key. After you gathered this information, open the terminal and type:

$ sudo usb_modeswitch --default-vendor [vendor code] --default-product [product code] --message-content [hex key]

Which in my case, for a Olicard 200, is:

$ sudo usb_modeswitch --default-vendor 0x0b3c --default-product 0xf000 --message-content 5553424312345678c000000080010606f50402527000000000000000000000
 
After you run this code, you should see an output of this kind:

Looking for default devices ...
 Found devices in default mode, class or configuration (1)
Accessing device 003 on bus 001 ...
Getting the current device configuration ...
 OK, got current device configuration (1)
Using endpoints 0x01 (out) and 0x81 (in)
Inquiring device details; driver will be detached ...
Looking for active driver ...
 OK, driver found ("usb-storage")
 OK, driver "usb-storage" detached

SCSI inquiry data (for identification)
-------------------------
  Vendor String: USBModem
   Model String: MMC Storage   
Revision String: 2.31
-------------------------

USB description data (for identification)
-------------------------
Manufacturer: USBModem
     Product: HSPA Data Card
  Serial No.: 1234567890ABCDEF
-------------------------
Setting up communication with interface 0 ...
Using endpoint 0x01 for message sending ...
Trying to send message 1 to endpoint 0x01 ...
 OK, message successfully sent
Resetting response endpoint 0x81
Resetting message endpoint 0x01
 Device is gone, skipping any further commands
-> Run lsusb to note any changes. Bye.

If the command succeed, like in this case, run lsusb. When you do, you should note a change, as the internet dongle has now changed its product-code to "c005".

Bus 008 Device 001: ID 1d6b:0001 Linux Foundation 1.1 root hub
Bus 007 Device 001: ID 1d6b:0001 Linux Foundation 1.1 root hub
Bus 006 Device 002: ID 04b4:0060 Cypress Semiconductor Corp.
Bus 006 Device 001: ID 1d6b:0001 Linux Foundation 1.1 root hub
Bus 005 Device 001: ID 1d6b:0001 Linux Foundation 1.1 root hub
Bus 004 Device 001: ID 1d6b:0001 Linux Foundation 1.1 root hub
Bus 003 Device 001: ID 1d6b:0001 Linux Foundation 1.1 root hub
Bus 002 Device 005: ID 0b3c:c005 Olivetti Techcenter
Bus 002 Device 003: ID 04f2:b044 Chicony Electronics Co., Ltd Acer CrystalEye Webcam
Bus 002 Device 001: ID 1d6b:0002 Linux Foundation 2.0 root hub
Bus 001 Device 001: ID 1d6b:0002 Linux Foundation 2.0 root hub

Reboot and you can now proceed to the next step.

3. Install your internet dongle (the normal way)


If you are lucky enough, your broadband internet might be working already. In the GUI, click on the Network Manager icon and see if the Broadband connection is available. If it is, click on it to set up a new connection and proceed to Step 4.
Otherwise, try to run on a terminal:

$ sudo modprobe usbserial vendor=[vendor code] product=[product code]

Which for an Olicard 200 is:

$ sudo modprobe usbserial vendor=0x0b3c product=0xc005

This commands adds a loadable kernel module to recognize your device. Straight after you run it, your system should automatically detect your device and you can proceed with configuring your internet dongle.

If even this method did not work (as it did not on my Olidata 200), and your Network Manager does not recognize the device, it means that you will need to find another way to let it work, so jump this section and go to Step 5.

Now that you have your working dongle, you need to do some final setups before configuring it. In order to get the modprobe command run at every boot, you need to append the previous command to /etc/rc.local, by running as root:

# sed -i '$ d' /etc/rc.local; echo 'modprobe usbserial vendor=0x0b3c product=0xc005' >> /etc/rc.local; echo 'exit 0' >> /etc/rc.local

As usual, replace 0b3c and c005 with your vendor code and product code.

 4. Connect to the internet


You now need to set up a new connection with your broadband dongle. If a connection wizard opens, you can follow the instructions on screen and it will automatically configure your dongle.

It may happen that your dongle does not like the network manager configuration. You can get around the problem using wvdial.

$ sudo gedit /etc/wvdial.conf

and copy the following text:

[Dialer Defaults]
Modem = /dev/ttyUSB0
ISDN = 0
Modem Type = Analog Modem
Baud = 460800
Init1 = ATX3
Init2 = AT&F Q0 V1 E0 S0=0 &C1 &D2 +FCLASS=0
Init3 = at+cgdcont=1,"IP","[APN]"
Phone = *99#
Dial Attempts = 5
Stupid Mode = on
Dial Command = ATDT
Idle Seconds = 7200
Ask Passwords = 0
Password = "[PW]"
Username = "[UN]"
Carrier Check = on
New PPPD = 1
Auto DNS = on

You should modify [APN], [PW], [UN] to your needs.
Then, you can connect using

$ sudo wvdial

Congratulations, your dongle should be working now!

5. Install your internet dongle (the alternative way)


If the "normal" way to install your dongle did not work, you should consider using a very neat utility, which usually works with picky internet dongles.
It is called Sakis 3G.

You just need to download it and extract it:

$ wget http://www.sakis3g.org/versions/latest/binary-free/sakis3g.gz
$ gunzip sakis3g.gz
$ chmod +x sakis3g

Before running it, you need to remove the modemmanager application which controls mobile broadband devices through the GUI Network Manager. This is because it may conflict with Sakis 3G.

$ sudo apt-get remove modemmanager

Then you can run the application:

$ ./sakis3g --interactive

And you can follow the screens to configure the dongle and connect to the internet:

- Connect with 3G
- USB Device
- Select USB Device (the name should be familiar)
- Select Interface (only one should work as modem)
- Select APN (should auto-detect)

If you see a screen informing you that the device connected: congratulations, you managed to make your internet wireless dongle work on a Linux OS!

Please comment to suggest other methods or if you have any problems.

Friday, 29 June 2012

10 Nautilus tips and tricks

Nautilus is the file manager for Gnome. Gnome is a GUI for many Linux distributions and it is my favourite so far.

A file manager is the program that manages and lets you access your files. In plain words, it is the window with folders and stuff in it. Knowing how to use it properly can let you save a lot of time (unless you want to use the terminal, which could be even faster), so here is a list of a few tips and tricks to improve your file managing experience!

You can open a new window from terminal (if you have Gnome) with the command:

nautilus &

1. Change default "Open with" program for an extension

A quite common problem is the one of changing the default program with which a file is opened. If you have a Windows background, you'll endlessly search in the "Open with" from the right-click menu, but you will not find the answer there. Fortunately, the solution is easy:

-   Right-click on file with interested extension
-   Click on "Properties" at the bottom of the menu
-   Go on the "Open with" tab
-   Select wanted application and click on "Set as default"

Now the application you selected will be used by default as main application to open the files with the same extension with a double-click.


2. Multiple Panes in one window

Sometimes we want to move files from one folder to another and it would be convenient to have both folders somehow open in the same window to ease the transfer. This is possible!
In a window, just press the F3 button and a new pane will appear (initially with the same folder showing to both frames). You can switch from a pane to another just clicking on the wanted frame.


3. Select items matching a pattern

If you want to select multiple files with a certain name only or, say, with the same extension, there is an easier way rather than doing that manually!

Press Ctrl+S in a window and a dialog will open asking for the pattern. You can use the power of wildcards in this window!

The wildcards you can use are * and ?. Their working is very simple. Whenever the find program sees a *, it substitutes any random string in it. Basically, if you type just: * . It means everything.
For the ? wildcard, instead, it will replace only one character. Then, typing ????? will match any string containing 5 letters or numbers, including the extension.

It should be now clear how powerful can it be using wildcards for selecting files. I will provide a few examples:

*.jpg
Will select every file with extension .jpg, i.e. every image in a folder.
*2012*.jpg
This, instead, will select every picture in the folder containing 2012 in its name (note that *2012.jpg will only look for pictures having 2012 at the end of the filename, and viceversa for 2012*.jpg).
*.*
This will select all files (while * would also select folders).
???.*
This will select any file that contains 3 characters, such as lol.jpg or asd.txt.


4. Move, Copy, Link

You can use the click-and-drag options also present in Windows under Nautilus:

-   If you click and drag files without pressing any additional key, it will chose what to do depending on the destination. It will move files if the destination is local (same hard disk) and copy if the destination is not on the same File System (external drive).
-   If you click and drag pressing the Ctrl key, it will copy the files in any case.
-   If you click and drag pressing the Shift key, it will move the files in any case.
-   If you click and drag pressing both the Ctrl and Shift key, it will create a (soft) link to the files.


5. Move windows from anywhere

For users with low resolution screen, it may happen that some windows have the title bar (to move it) outside the borders of the screen.
This is quite annoying and it may be even impossible to close it, as the X button is hidden.
In order to move the Window, though, you can keep pressed the Alt key and left-click anywhere inside the window to move it!


6. Resize windows from anywhere

Similar to the previous one, but press Alt and middle-click with your mouse to resize the window without having to hunt for the border!


7. Run common scripts with one click

Nautilus has a default script folder in which you can put your bash scripts and run them by just selecting them (e.g. a script to remove files older than a certain date, or a script to clean the name of the selected files... you can really use your imagination here).

This is extremely useful and you can either download bash scripts or make your own. You just need to right-click and then select the "Scripts" menu, then the script which you want to run. You may find the script folder empty, initially.

In order to add your scripts to the list, you need to put your scripts in the scripts folder for nautilus. You can open it clicking on "Open scripts folder" from the same "Scripts" menu, but it is usually located in ~/.gnome2/nautilus-scripts . 


8. Quickly check number and size of multiple files

If you need to quickly know how big is a collection of files, it will be necessary to select them and check the bottom right corner of the folder. The number of the files selected, together with their total size is displayed in a pop-up balloon.


9. Keyboard shortcuts

This is a list of shortcuts to quickly perform the underlined actions. For some of them (e.g. Rename) you need to highlight a file first.

Rename: F2
Create new folder: Shift+Ctrl+N

Cut: Ctrl+X
Copy: Ctrl+C
Paste: Ctrl+V
Select All: Ctrl+A
Invert Selection: Shift+Ctrl+I

Add to Bookmarks: Ctrl+D
Search for Files: Ctrl+F

Move to Parent folder: Alt+↑
Move to Selected folder: Alt+↓
Move back: Alt+←
Move forward: Alt+→


10. Gnome 3 window tricks

This tricks will work only with Gnome 3.

Expand window: you can double-click on the title-bar to expand a window in any Gnome, but with Gnome 3 you can drag the title bar and push the window to the top to automatically expand it.

Divide screen between two windows: drag the window from the title bar and push it to the left (or right) to expand the window to half the size of the screen.

Open the activities: without clicking, push your mouse to the top right corner. This will open the "Activities menu".